Imagine this: you're craving a sweet, comforting treat, but time is short. Perhaps an unexpected guest is arriving, or you simply want to elevate your afternoon coffee into a mini celebration. Enter the magic of glazed jam scones! These delightful, flaky wonders are more than just a baked good; they're a promise of warmth, flavor, and a touch of elegance, all achievable in just 30 minutes from start to finish. Forget complicated patisserie; these quick and easy Homemade Buttermilk Jam Scones with Irresistible Glaze are your ticket to an instant tea party, perfect for any time of day.
Quick & Easy Glazed Jam Scones: Your 30-Minute Tea Party Treat
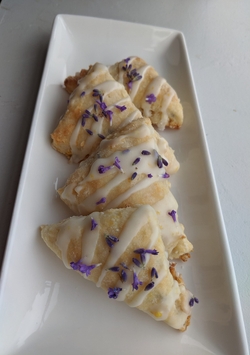
The concept of a "tea party treat" often conjures images of intricate pastries and hours spent in the kitchen. But what if we told you that pure, unadulterated baking joy could be yours in half an hour? Our glazed jam scones defy expectations, delivering a tender crumb, a burst of fruity jam, and a sweet, buttery vanilla glaze that will have everyone asking for more. They're not just quick; they're incredibly satisfying and undeniably charming.
The beauty of these scones lies in their simplicity and the clever combination of classic techniques with a speedy execution. Each bite offers a harmonious blend of the slightly crumbly, rich scone base, the gooey, sweet fruit jam cooked right into its center, and the delightful snap of a buttery vanilla glaze. Whether served warm with the glaze slightly melted or cooled with a firm, crunchy finish, these scones are a delightful surprise. While some might initially wonder, "What exactly is a jam scone?", the first taste invariably turns them into instant fans. They're an adorable and delicious creation, perfect for sharing with friends and family, or simply indulging yourself. To truly appreciate the artistry behind these charming pastries, you might want to Discover the Secret to Adorable & Delicious Glazed Jam Scones.
The Magic Behind the 30-Minute Scone: Key Ingredients & Techniques
Achieving perfectly tender and flaky scones in such a short time requires understanding the role of a few key ingredients and techniques. Our recipe, yielding approximately 12 generous servings (at 234 calories each), leverages the power of cold butter and buttermilk to create that coveted texture.
- Cold Unsalted Butter: This is the secret weapon for flakiness. When cold butter is cut into the flour mixture, it creates tiny pockets. As the scones bake, the butter melts and releases steam, pushing up the layers of dough and resulting in a light, airy, and flaky texture. Using unsalted butter gives you control over the overall saltiness.
- Buttermilk: The acidity in buttermilk reacts with the baking powder, producing extra lift and contributing to a tender crumb. It also adds a subtle tang that balances the sweetness of the jam and glaze. If you don't have buttermilk on hand, you can make a quick substitute by adding a tablespoon of lemon juice or white vinegar to regular milk and letting it sit for 5-10 minutes.
- Baking Powder & Salt: These leavening agents are crucial for giving the scones their rise and lightness. Salt enhances all the flavors.
- Your Jam of Choice: This is where you can personalize your scones! While raspberry is a classic favorite, strawberry, apricot, or even a unique peanut butter jam (as suggested by King Arthur Baking for a "jam-bellied" scone) work beautifully. The jam cooks down in the oven, becoming thick and syrupy, forming a delightful complement to the scone.
- The Buttery Vanilla Glaze: A simple yet essential finish. Made with powdered sugar, melted butter, milk, vanilla extract, and a pinch of salt, this glaze adds an irresistible sweetness and a lovely sheen that makes these scones truly sparkle. The small amount of melted butter in the glaze adds a richness that sets it apart from a plain sugar glaze.
The quick total time is achieved by keeping the dough handling to a minimum and utilizing a food processor for efficient mixing. This prevents overworking the dough, which can lead to tough scones.
Step-by-Step Guide to Perfect Glazed Jam Scones
Ready to bake? Here's how to create your own batch of irresistible glazed jam scones:
Scone Ingredients:
- 3 ½ cups (420g) all-purpose flour
- 3 tablespoons (38g) granulated sugar
- 2 tablespoons baking powder
- ½ teaspoon salt
- ¾ cup (6oz) cold unsalted butter, cut into 1-inch pieces
- 1 ¼ cup buttermilk
- ½ tablespoon of your favorite jam per scone (approx. ¾ cup total)
Egg Wash Ingredients:
- 1 large egg
- 1 tablespoon water
Buttery Vanilla Glaze Ingredients:
- 1 cup (120g) powdered sugar
- 1 tablespoon unsalted butter, melted
- 1 to 3 tablespoons milk (start with 1, add more to reach desired consistency)
- ¼ teaspoon vanilla extract
- ⅛ teaspoon salt
Instructions:
- Prepare Your Workspace: Preheat your oven to 400°F (200°C). Line a large baking sheet with parchment paper.
- Mix Dry Ingredients for Scones: In the bowl of your food processor, combine the all-purpose flour, granulated sugar, baking powder, and ½ teaspoon salt. Pulse a few times to ensure they are well mixed.
- Cut in the Butter: Add the cold, 1-inch pieces of unsalted butter to the dry ingredients. Pulse until the butter is incorporated and no pieces larger than a small pea remain. This is crucial for flaky scones!
- Add Buttermilk: Pour in the buttermilk. Pulse just until the ingredients begin to come together and form a sticky dough. Be careful not to overmix.
- Form the Dough: Lightly dust a clean work surface with flour. Turn the scone dough out onto the floured surface. Sprinkle a little flour on top of the dough and gently pat it down until it is about ¾ of an inch thick.
- Cut Out Scones: Using a 2 ½-inch biscuit cutter or the rim of a glass, cut out approximately 12-16 rounds. Gently press any dough scraps together and re-flatten as needed to cut more scones, being careful not to overwork the dough.
- Prepare for Jam: Place the cut scone rounds onto your prepared baking sheet. Using your thumb or the back of a small spoon, make a deep well in the center of each scone, big enough to hold about ½ tablespoon of jam.
- Fill with Jam: Carefully spoon your chosen jam into each well, filling just to the top. Avoid overfilling, or the jam may bubble over excessively during baking.
- Apply Egg Wash: In a small bowl, whisk together the egg and 1 tablespoon of water. Lightly brush the tops of the scones (avoiding the jam well) with this egg wash. This will help them achieve a beautiful golden-brown color.
- Bake: Transfer the baking sheet to your preheated oven. Bake for 14 to 16 minutes, or until the tops are lightly golden brown and the scones are cooked through.
- Prepare the Glaze: While the scones are baking or cooling slightly, prepare the glaze. In a small bowl, whisk together the powdered sugar, melted butter, 1 tablespoon of milk, vanilla extract, and ⅛ teaspoon salt until the mixture is smooth. If the glaze is too thick, add up to 2 more tablespoons of milk, one teaspoon at a time, until you reach a pourable yet thick consistency.
- Glaze and Serve: Once the scones have cooled slightly (or completely, if you prefer a crunchy glaze), drizzle or spread the buttery vanilla glaze over each one. Serve warm for a gooey jam experience or cooled for a set glaze.
Pro Tips for Glazed Jam Scone Perfection & Variations
Even though these glazed jam scones are designed to be quick and easy, a few expert tips can elevate your baking game:
- Keep it Cold: Always ensure your butter and buttermilk are as cold as possible. This is paramount for achieving that desirable flaky texture. You can even cube your butter and then freeze it for 10-15 minutes before adding it to the flour.
- Don't Overwork the Dough: Overmixing develops gluten, leading to tough scones. Aim for a sticky, slightly shaggy dough that just barely comes together. Handle it gently when patting and cutting.
- Jam Selection: Experiment with different jams! While raspberry is classic, try apricot for a sophisticated touch, cherry for a vibrant burst, or even a citrus marmalade. Just ensure the jam isn't too runny, as it might spread too much during baking.
- Customizing Your Glaze: Feel free to infuse your glaze with other flavors. A tiny bit of almond extract instead of vanilla, or a touch of lemon zest mixed into the glaze, can add an exciting twist.
- Serving Suggestions: These scones are fantastic on their own, but they also pair wonderfully with a dollop of clotted cream (for a truly traditional experience) or a side of fresh berries.
- Storage: Store leftover scones in an airtight container at room temperature for 2-3 days. Reheat gently in the microwave or a warm oven for a fresh-baked feel. The glaze might soften, but the flavor will still be delicious.
More Than Just a Scone: The Tea Party Dream (and Beyond)
These glazed jam scones are truly a versatile delight. While they undeniably steal the show at any impromptu "tea party" – fulfilling even the most whimsical childhood fantasies – their charm extends far beyond. Imagine them as a comforting breakfast alongside your morning coffee, a delightful addition to a weekend brunch spread, or a sophisticated dessert to round off a light meal.
The simple act of baking these scones creates a wonderful aroma that fills your home, promising warmth and comfort. They are the perfect embodiment of homemade goodness without the fuss, proving that exceptional baking doesn't always require hours of dedicated effort. Whether you're trying to recreate a perfect tea party fantasy for yourself, or simply want to treat your loved ones (or yourself!) to something special, these scones are sure to be a hit. They're a testament to how simple ingredients, when combined with a little love and smart techniques, can create something truly extraordinary.
So, the next time you find yourself yearning for a quick yet elegant treat, remember these quick & easy glazed jam scones. In just 30 minutes, you can transform simple ingredients into a tea party-ready delight that's sure to impress. With their flaky texture, sweet jam centers, and irresistible buttery vanilla glaze, they’re a perfect example of how delicious homemade baking can be both accessible and incredibly rewarding. Happy baking!
