Homemade Buttermilk Jam Scones with an Irresistible Glaze: Your Next Baking Obsession
There's something uniquely comforting and utterly delightful about a fresh scone, still warm from the oven. But imagine taking that classic comfort to a whole new level: soft, tender buttermilk scones, baked with a sweet, fruity jam nestled deep inside, and then generously drizzled with a buttery, vanilla-infused glaze. These aren't just any scones; these are homemade
glazed jam scones – an exquisite treat that transforms any ordinary moment into a special occasion. Perfect for a leisurely breakfast, an elegant afternoon tea, or simply a sweet indulgence, these jam-filled wonders promise to become a staple in your baking repertoire. Forget complex desserts; the charm of these adorable, delicious treats lies in their simple elegance and explosion of flavor with every bite.
Why Homemade Glazed Jam Scones are a Must-Try
The appeal of these homemade
glazed jam scones extends far beyond their charming appearance. They offer a multi-sensory experience that plain scones simply can't match. Picture this: a golden-brown exterior, slightly crisp from the bake, giving way to a soft, tender crumb. Then, you encounter the vibrant heart of the scone – a pocket of warm, syrupy jam that has cooked down to an intense, fruity essence. This "jam-bellied" delight is then crowned with a smooth, sweet, vanilla-scented glaze that sets to a delicate crunch, adding another layer of texture and sweetness.
What makes these particular scones truly stand out?
*
Buttermilk Base: The secret to their incredible tenderness lies in the buttermilk. Its acidity reacts with the baking powder, resulting in a lighter, fluffier scone with a subtle tang that complements the sweetness of the jam and glaze.
*
Hidden Treasure: Unlike traditional scones served *with* jam, these have the jam baked *into* them. This means every bite guarantees that perfect ratio of scone to sweet fruit, preventing any dry spots and adding an unexpected burst of flavor.
*
The Irresistible Glaze: A simple yet decadent glaze of powdered sugar, melted butter, milk, and vanilla extract elevates these scones from a humble pastry to a truly special dessert. It adds moisture, sweetness, and that signature glossy finish.
*
Versatility: Whether served warm, with the jam still gooey and the glaze melting slightly, or cooled, with the glaze set and crunchy, these scones are a hit. They travel well, make fantastic gifts, and are always ready to impress.
From casual brunch gatherings to sophisticated tea parties, these
glazed jam scones are not just food; they're an experience, a memory in the making.
Mastering the Art of Flaky Buttermilk Scones
Creating the perfect scone might seem intimidating, but with the right techniques, you'll achieve bakery-quality results right in your own kitchen. The foundation of our irresistible jam scones is a tender, flaky buttermilk base.
Essential Ingredients and Their Roles:
To embark on your scone-making journey, gather these key ingredients:
*
All-Purpose Flour: The structural backbone. Accurate measurement is crucial; spoon flour into your measuring cup and level it off to avoid dense scones.
*
Sugar: Adds a touch of sweetness to the scone itself, balancing the tang of the buttermilk.
*
Baking Powder: The primary leavening agent, responsible for the scones' rise and light texture when combined with buttermilk.
*
Salt: Enhances all the other flavors and balances the sweetness.
*
Cold Unsalted Butter: This is perhaps the most critical ingredient. Cut into small, 1-inch pieces, cold butter creates pockets of steam as it melts during baking, resulting in those coveted flaky layers. Using unsalted butter gives you control over the salt content.
*
Buttermilk: Provides moisture, tenderness, and reacts with the baking powder for an optimal rise. Its acidity also helps tenderize the gluten in the flour.
The Dough-Making Process:
Precision and gentle handling are key to flaky scones.
1.
Preheat and Prep: Set your oven to 400°F (200°C) and line a baking sheet with parchment paper. This prevents sticking and ensures even baking.
2.
Dry Ingredients: In a food processor, combine the flour, sugar, baking powder, and salt. Pulse briefly to mix thoroughly.
3.
Incorporate the Butter: Add the cold butter pieces to the dry ingredients. Pulse in short bursts until the butter is broken down into pea-sized pieces. It's crucial not to over-process; some small chunks are desirable. This step is where the flakiness is born!
4.
Add Buttermilk: Pour in the cold buttermilk. Pulse just until the ingredients start to come together and form a sticky dough. Resist the urge to overmix; overworking the dough develops gluten, leading to tough scones.
5.
Shape the Dough: Lightly flour a clean work surface. Turn the sticky dough out onto it and sprinkle a little flour on top. Gently pat the dough down until it's about 3/4 of an inch thick.
6.
Cut the Rounds: Using a 2 1/2-inch biscuit cutter (or a glass of similar size), cut out approximately 16 rounds. Try to cut straight down without twisting the cutter, as twisting can seal the edges and inhibit rise. Gently re-gather and flatten any scraps, patting them together to cut out additional scones.
7.
Create the "Well": Carefully transfer the scone rounds to your prepared baking sheet. Using your thumb or the back of a small spoon, make a deep well in the center of each scone. This well needs to be substantial enough to hold about half a tablespoon of jam without overflowing.
8.
The Egg Wash: Whisk one egg with a tablespoon of water. Lightly brush this egg wash over the tops of the scones (avoiding the jam well for now). This provides a beautiful golden-brown finish and a slight sheen.
Following these steps meticulously will set you up for scone success, ensuring a tender, flaky foundation for your delicious jam filling. For a more visual guide to perfecting your scone technique, you might find our article
Discover the Secret to Adorable & Delicious Glazed Jam Scones particularly helpful!
The Sweet Heart: Choosing and Filling Your Jam
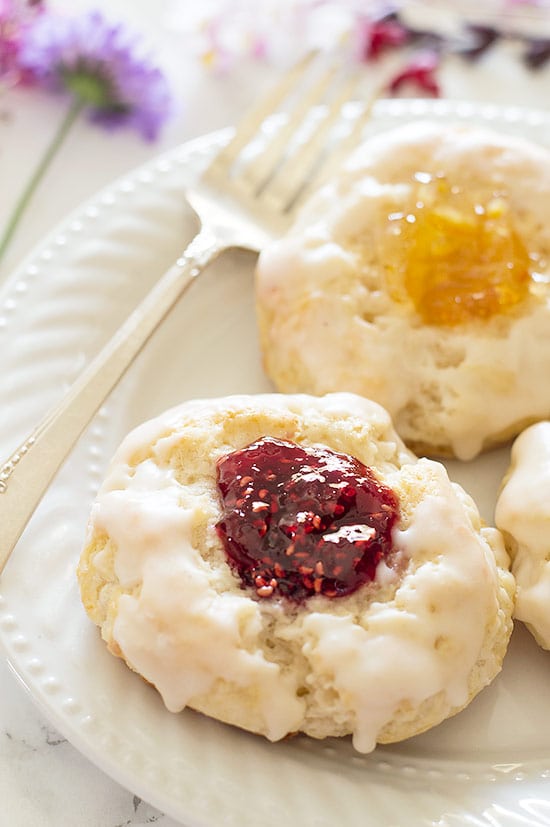
The "jam-bellied" aspect is what truly sets these
glazed jam scones apart. The choice of jam is paramount, as it dictates the core flavor profile of your scone.
Selecting Your Jam:
While raspberry jam is a classic and highly recommended choice, the beauty of this recipe lies in its adaptability. Consider these options:
*
Raspberry: Offers a delightful balance of sweetness and tartness, and its vibrant color is visually appealing.
*
Strawberry: A crowd-pleaser, delivering pure, comforting sweetness.
*
Apricot: Provides a slightly more sophisticated, mellow fruitiness.
*
Blueberry: Adds a lovely burst of tang and a beautiful purple hue.
*
Peanut Butter Jam: For an American twist, inspired by some creative recipes, a dollop of peanut butter with a swirl of grape jelly can create a unique flavor profile for those who love a PB&J.
When choosing, opt for a good quality jam or preserve with a relatively thick consistency. Runnier jams are more prone to bubbling over and creating a sticky mess on your baking sheet.
The Art of Filling:
Once your scone wells are ready, it's time to add the jam.
1.
Fill Carefully: Spoon about half a tablespoon of your chosen jam into each well.
2.
Avoid Overfilling: This is a crucial tip! While it's tempting to load up on jam, filling just to the top of the well is essential. Overfilling will cause the jam to bubble out of the scone during baking, making them stick to the parchment paper and creating a caramelized mess on your tray. The jam will naturally cook down and intensify in flavor within its scone embrace.
3.
Bake to Perfection: Place the jam-filled scones in your preheated 400°F (200°C) oven. Bake for 14 to 16 minutes, or until the tops are lightly golden brown and the jam is bubbly and slightly thickened. The baking process transforms the jam into a warm, gooey, syrupy delight, perfectly complementing the soft scone.
The Irresistible Finish: Crafting the Perfect Buttery Vanilla Glaze
No homemade
glazed jam scones would be complete without their namesake glaze. This final touch adds an extra layer of sweetness, moisture, and that characteristic glossy finish that makes these scones so visually appealing and utterly delicious.
Ingredients for the Glaze:
The glaze is wonderfully simple, requiring just a few pantry staples:
*
Powdered Sugar (Confectioners' Sugar): Provides the smooth, sweet base for the glaze.
*
Melted Unsalted Butter: Adds richness and a delicious buttery flavor, elevating the glaze beyond a simple sugar syrup.
*
Milk: Used to adjust the consistency of the glaze. You'll start with a small amount and add more as needed.
*
Vanilla Extract: Essential for that warm, aromatic flavor that pairs beautifully with both the scone and the jam.
*
Pinch of Salt: A tiny bit of salt in a sweet glaze helps to balance the sweetness and brighten the other flavors.
Mixing and Applying the Glaze:
1.
Combine Ingredients: In a small bowl, whisk together the powdered sugar, melted butter, 1 tablespoon of milk, vanilla extract, and the pinch of salt.
2.
Adjust Consistency: Continue whisking until the mixture is completely smooth. The ideal consistency is thick enough to coat the back of a spoon but still pourable. If it's too thick, add up to 2 more tablespoons of milk, a teaspoon at a time, until you reach your desired consistency. If it becomes too thin, add a little more powdered sugar.
3.
Glaze the Scones: Once the scones have cooled slightly (they can be warm, but not piping hot, or the glaze will melt completely), drizzle the glaze generously over each one. You can use a spoon or a whisk to create delicate drizzles.
4.
Set and Serve: Allow the glaze a few minutes to set, especially if you prefer a slightly crunchy top. These scones are phenomenal served warm, allowing the jam to remain gooey and the glaze to be soft. They are equally delightful cooled, with the glaze firm and crunchy, making them perfect for on-the-go enjoyment or packing into lunchboxes.
Beyond the Basics: Tips for Scone Success and Variations
Achieving consistently perfect
glazed jam scones involves a few tried-and-true baking principles. Here are some extra tips and ideas to elevate your scone game:
Pro Tips for Scone Perfection:
*
Keep Everything Cold: From butter to buttermilk, cold ingredients are your best friend. This prevents the butter from melting prematurely, ensuring flaky scones. You can even chill your flour and biscuit cutter for 15-20 minutes before starting.
*
Don't Overwork the Dough: Gentle handling is paramount. Overmixing develops gluten, leading to tough, dense scones. Mix just until combined.
*
Measure Flour Accurately: Too much flour is a common culprit for dry, heavy scones. Spoon the flour into your measuring cup and level it off with a straight edge rather than scooping directly from the bag.
*
Refrigerate Dough (Optional): If your kitchen is warm or you want to make ahead, chilling the cut scones on the baking sheet for 15-30 minutes before baking can help them hold their shape and ensure a better rise.
*
Storage: Store leftover scones in an airtight container at room temperature for up to 2-3 days. Reheat gently in the microwave or oven for that fresh-baked feel.
Flavor Variations to Explore:
While the classic buttermilk and jam combination is superb, don't hesitate to experiment:
*
Citrus Zest: Add a teaspoon of lemon, orange, or lime zest to the dry ingredients for a bright, aromatic twist.
*
Spices: A pinch of cinnamon, nutmeg, or cardamom in the scone dough can add warmth and complexity.
*
Different Glaze Flavors: Try a lemon glaze (lemon juice instead of milk) for a zingy contrast, or an almond glaze (almond extract instead of vanilla) for a sophisticated touch.
*
Mini Scones: For delightful bite-sized treats, use a smaller biscuit cutter (e.g., 1.5-inch) and adjust baking time accordingly.
Whether you're hosting an elaborate tea party (perhaps with a Disney princess on the guest list, as one source playfully suggests!) or simply craving a moment of sweet indulgence, these homemade
glazed jam scones are a perfect choice. For those looking to whip up these treats in a flash, our guide to
Quick & Easy Glazed Jam Scones: Your 30-Minute Tea Party Treat offers even more speedy insights.
Conclusion
From the moment they emerge golden and fragrant from the oven, to the last crumb of their tender, jam-filled delight, these homemade buttermilk
glazed jam scones are a testament to the simple joys of baking. They represent more than just a recipe; they are an invitation to slow down, savor a moment, and share a truly special treat with loved ones. With their flaky texture, sweet hidden jam, and glistening glaze, these scones are undeniably adorable, irresistibly delicious, and surprisingly straightforward to make. So, roll up your sleeves, gather your ingredients, and prepare to fall in love with your new favorite tea-party ready confection. Your taste buds, and perhaps your imaginary tea party guests, will thank you.