Discover the Secret to Adorable & Delicious Glazed Jam Scones
Imagine a perfect bite: a tender, flaky scone, yielding to reveal a warm, luscious pocket of fruity jam, all crowned with a delicate, sweet vanilla glaze. This isn't just a daydream; it's the reality of
homemade buttermilk jam scones with irresistible glaze. Far from being a complicated patisserie creation, these delightful treats are surprisingly simple to master, promising an elevated baking experience and a truly enchanting result. Whether you're hosting a sophisticated tea party, seeking a comforting breakfast pastry, or simply craving something sweet and special, glazed jam scones are your ultimate answer.
Often lauded as "the most adorable things to come out of the kitchen," these scones combine the rustic charm of a classic buttermilk scone with the playful surprise of a jam-filled center, all tied together with a glistening, buttery vanilla glaze. Forget bland, dry scones; this recipe guarantees a moist, crumbly texture that perfectly complements the rich, syrupy jam within. And the best part? From start to finish, you're looking at just about 30 minutes of total time, making them a perfect last-minute indulgence or a quick impressive treat.
The Magic Behind Perfect Glazed Jam Scones: Why This Recipe Shines
What makes a glazed jam scone so uniquely captivating? It's a symphony of textures and flavors. The scone itself forms the foundation – a wonderfully light and tender base thanks to the precise balance of flour, leavening, and cold butter. The buttermilk adds a subtle tang and helps create that desirable tender crumb, ensuring your scones are never dry or tough.
But the true star, arguably, is the jam. Tucked lovingly into the heart of each scone, the jam undergoes a delightful transformation in the oven. It simmers and thickens, intensifying its fruity essence and becoming wonderfully gooey and syrupy. This molten core provides a burst of flavor and a soft, yielding texture that contrasts beautifully with the slightly crisp exterior of the scone.
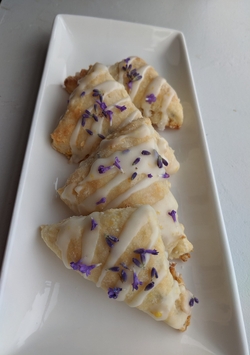
Finally, the buttery vanilla glaze acts as the glorious finale. It sets into a sweet, slightly crunchy shell, adding another layer of sweetness and a hint of vanilla that perfectly harmonizes with both the scone and the jam. This isn't just a topping; it's an integral part of the experience, elevating each bite from simply delicious to truly extraordinary. And with a serving coming in at approximately 234 kcal, it’s a delightful indulgence that feels wonderfully light.
Crafting Your Glazed Jam Scones: A Step-by-Step Culinary Journey
Creating these adorable
quick & easy glazed jam scones: your 30-minute tea party treat is an accessible baking adventure, even for novices. With a yield of approximately 16 delightful rounds and only 14 ingredients, you're just moments away from a batch of warm, fragrant perfection.
Essential Ingredients You'll Need:
- 3 ½ cups (420g) all-purpose flour
- 3 tablespoons (38g) sugar
- 2 tablespoons baking powder
- ½ teaspoon salt
- ¾ cup (6oz) cold unsalted butter, cut into 1-inch pieces
- 1 ¼ cup buttermilk
- Jam of choice (raspberry is a popular favorite!)
- 1 egg
- 1 tablespoon water
- 1 cup (120g) powdered sugar
- 1 tablespoon unsalted butter, melted
- 1 to 3 tablespoons milk
- ¼ teaspoon vanilla extract
- ⅛ teaspoon salt (for the glaze)
The Baking Process:
- Preheat and Prep: Begin by preheating your oven to a cozy 400°F (200°C). Line a baking sheet with parchment paper, ensuring a non-stick surface for your delicate scones.
- Scone Dough Perfection: In your trusty food processor, combine the dry ingredients for the scones: flour, sugar, baking powder, and ½ teaspoon of salt. Pulse briefly to mix. Now, introduce your cold, cubed butter. This is crucial for flaky scones; the cold butter creates pockets of steam in the oven, leading to that coveted light texture. Pulse the mixture until the butter pieces are no larger than a pea.
- Moistening the Dough: Add the buttermilk to the food processor. Pulse sparingly, just until the ingredients start to come together and form a sticky dough. Be careful not to overmix; overworking the dough develops gluten, leading to tough scones.
- Shaping Your Rounds: Lightly dust a clean work surface with flour. Gently turn out the sticky dough. Sprinkle a little flour on top and carefully pat it down until it's about ¾ of an inch thick. Using a 2 ½-inch biscuit cutter (or even the rim of a glass), cut out your scone rounds. For the flakiest results, press straight down and avoid twisting the cutter. Gather and gently re-pat any scraps to cut out additional rounds until all dough is used. You should get about 16 scones.
- The Jam's Sweet Secret: Carefully transfer your scone rounds to the prepared baking sheet. Using your thumb, create a deep well in the center of each scone. This well should be large enough to hold about ½ tablespoon of your chosen jam. Fill each well just to the top with jam. Overfilling can cause the jam to bubble over and spread too much during baking.
- The Golden Finish (Egg Wash): In a small bowl, whisk together the egg and 1 tablespoon of water. This creates an egg wash. Lightly brush the tops of your scones (avoiding the jam) with this mixture. The egg wash will give your scones a beautiful golden-brown sheen as they bake.
- Bake to Perfection: Place the baking sheet in the preheated oven and bake for 14 to 16 minutes, or until the tops are lightly browned and the scones are cooked through.
- That Irresistible Glaze: While the scones are baking or cooling slightly, prepare the glaze. In a small bowl, whisk together the powdered sugar, melted butter, 1 tablespoon of milk, vanilla extract, and ⅛ teaspoon of salt until the mixture is smooth. If the glaze is too thick, add up to 2 more tablespoons of milk, one teaspoon at a time, until you reach a pourable, yet thick, consistency.
- Glaze and Serve: Once the scones are slightly cooled (or even still warm for a gooey experience!), drizzle or spread the glaze generously over each one. These glazed jam scones can be served warm, with the glaze soft and melty, or cooled, allowing the glaze to set into a delightful, slightly crunchy layer.
Beyond the Basics: Elevating Your Glazed Jam Scone Experience
While the classic glazed jam scone is a triumph in itself, there are endless ways to personalize and elevate your baking.
*
Jam Varieties: Experiment with different jams! While raspberry is a classic, strawberry, apricot, cherry, or even a spicy pepper jam could offer unique and delicious twists. Consider using a good quality, fruit-forward jam for the best flavor.
*
Flour Power: For an even richer, tender scone, you could explore using cake flour for a portion of the all-purpose flour, or a touch of whole wheat flour for a nuttier, heartier flavor profile.
*
Spice it Up: A pinch of cinnamon, nutmeg, or cardamom added to the scone dough can introduce a wonderful warmth, especially when paired with berry or apple jams. A hint of lemon zest in the dough can also brighten the overall flavor.
*
Glaze Variations: Beyond the buttery vanilla glaze, consider a lemon glaze (powdered sugar, lemon juice, and a tiny bit of zest) for a zesty counterpoint, or even a simple cream cheese glaze for added richness.
*
Serving Suggestions: These scones are incredible on their own, but for a true tea party experience, serve them alongside clotted cream and extra jam. They also make a fantastic addition to a brunch spread or as a sophisticated dessert.
*
Storage: Store cooled, glazed scones in an airtight container at room temperature for up to 2-3 days. They are best enjoyed fresh, but a quick re-warming in the oven can revive their tenderness.
Conclusion
There's something inherently comforting and celebratory about a fresh-baked scone, and when it's lovingly filled with sweet jam and crowned with a luscious glaze, it transcends into a truly special treat. Glazed jam scones are a testament to the joy of simple, quality ingredients coming together to create something extraordinary. This recipe offers not just a delicious outcome but also an enjoyable baking process, promising to fill your kitchen with irresistible aromas and your table with "adorable and delicious" delights. So, dust off your apron, gather your ingredients, and prepare to discover the secret to these enchanting pastries – a secret that's now yours to share and savor!